Cut crease makeup is extremely popular on Instagram these days and I've been seeing it paired with glittery liner outline for that extra pop of glam. Naturally, I wanted to try it for myself, although my eye shape is definitely not made for these kind of looks. I made it to fit my preference and eye shape. It looked so much prettier in real life, because glittery anything just doesn't look as nice on the photos as it does in real life.
Showing posts with label sparkly. Show all posts
Christmas Sparkle
21 Dec 2017
I always associate Christmas with red and sparkles. Usually I would go with a sparkly eyeliner, but I decided to do something different this year. It's a combination of my favorites - bit of sparkle, red lip and winged liner.
I wanted this makeup look to be simple, but still a bit sparkly. First I used mix of two warm matte brown shades to slightly define my crease. The star of the look is winged liner, so I skipped any eyeshadow on the actual lid. For the eyeliner I used burgundy shade to do a basic wing. I applied warmer and lighter red shade on top of burgundy and tried to blend it in. I also set it with a red eyeshadow to diffuse the edges a bit and make it slightly softer.
I used the same browns on my lower lash line. In the inner corners I started by applying a creamier shimmery light yellow gold eyeliner as a base. On top of that I put a mix of copper gold bigger glitter and smaller metallic gold glitter. I actually decided to extend the shimmer up in the inner corners pass the crease and also made it slightly longer on the inner corner of the lower lash line. It makes the look slightly more sparkly and offsets the wing on the other side.
I usually can't be bothered to apply false lashes, because I always struggle with them, so I just applied a bit of mascara and half lashes. Half lashes are shorter and can be applied only on the outer half of the lash line, so it sticks better and looks more natural. I choose style that wings out, because it suits my winged liner well. Unfortunately, camera never picks up glitter as nice as it looks in the real life. It looks much more sparkly as glitter catches the light.
I did my usual face paint - foundation, concealer and powder. For this warm red look I also needed to bronzed myself up with a bit of bronzer to add me warmth and color. I used gold champagne highlighter to match my sparkly eye inner corners. For the blush I went with a muddy redish color that looks natural and pairs with red lipstick, but I applied it fairly light.
For the lips I went with a very bright orange red, my favorite. These colors make a statement and make me feel happy. Sometimes I can look paler with a brighter color, so I usually just use a bit of bronzer and that makes it more wearable.
Red eyeliner is one of my new favorite things to do. It just looks unusual because of the color, but kind of classic because of the wing. This look could be worn with a more neutral lip color, but why not use the red. It just gives the complexion that oomph and makes it look more lively. I also like that it's not too glittery, but just gives you that lovely sparkle in the inner corners.
Products used
Face:
Bourjois Healthy Mix Foundation 51 Light Vanilla
NYX Pro Foundation Mixer White Blanc
Look By Bipa Matte Camouflage Concealer 010 Light
Paese Rice Powder
Physicians Formula Butter Bronzer
MAC Blush Pinch Me
theBalm Mary-Lou Manizer
Eyes:
Etude House Proof 10 Eye Primer
Nabla Eyeshadow Caramel
Colourpop Yes, Please! Palette - Note to Self
Beyu Soft Liner For Lips And More - 547 Burnt Sienna
Beyu Soft Liner For Lips And More - 553 New Boundaries
Colourpop Yes, Please! Palette - Spoiled
Avon True Colour Glimmerstick Diamond Eyeliner Golden Diamond
Beauty People Flash Fix Pearl Pigment Pact 1 Ssum Light
Essence Metal Shock Eyeshadow 01 Solar Explosion
Beyu Beauty Queen Volume Mascara
Duo Eyelash Adhesive White-Clear
Essence Lashes To Impress 03 Half Lashes
Lips:
Avon Mark Liquid Lip Lacquer Matte - Orange You Happy
Oznake:
glitter,
gold,
makeup,
red eyeliner,
red lipstick,
sparkly
Let It Sparkle!
22 Dec 2016
Christmas is fast approaching and I couldn't pass the opportunity to do a sparkly liner look for Christmas makeup look. I actually wore this yesterday, when I went shopping. I think a few of the sales people noticed my sparkly eyes, but no one actually said anything. They probably thought I was already embracing the Christmas spirit a bit too much.
I started my eye shadow look with a primer and bone colored matte base. Then I used very light warm matte brown to carve out the crease. I deepened the crease with warm matte brown. On the lid I applied matte orange red shade.
I darkened inner corners with a matte chocolate brown. Over the redish base I applied a sheer shimmery shade that gives off golden green sheen. I just used warm redish base to create a warm base underneath. On the lower lash line I applied the same light matte brown. Around the lash line I applied shimmery medium green shade and I darkened outer corners with a shimmery dark forest green shade.
For my eyeliner, I went strong and did a wing with a pen liquid liner. To add some of that sparkle that shouldn't be missing on Christmas, I added shimmery gold liner on top of it. Unfortunately this created a bit of chunks, but I don't mind. It looked prettier in person.
I finished with lots of volumizing mascara and a light golden highlight in the inner corners. Later I also decided that this look needs a bit of false lashes, so I added a few individual ones mainly to the outer corners.
I also applied my usual foundation, concealer and powder. This time I also contoured my cheeks just a tiny bit and added bronzer on the outer edges. I also used a creamy sheer golden highlight on top of foundation and I also went over it with a powder light golden highlight on the cheeks. For the blush I went with a muddy looking peach shade.
You can wear this look with nude lips to keep all the attention on the eyes, like I did here. I used a mix of light nude peach and brown matte lipstick.
Or you can pair it with a classic creamy red lipstick as I did here. Red lipstick is just perfect for a Christmas makeup looks. It brights us any skin tone and matches you to your Christmas tree - well at least in my case.
I love those sparkly eyes. Light catches all the sparkles and it even looks really pretty on slightly hooded eyes. It's also not too bright, so a red lip matches it well.
Products used
Face:
Bourjois Healthy Mix Foundation 51 Light Vanilla
Missha Perfect Cover B.B. Cream 21 Light Beige
Mac Pro Longwear Concealer NC15
E.l.f. High Definition Powders Sheer
Kiko Flawless Fusion Bronzer Powder 01
theBalm Mary-Lou Manizer
Catrice LE Pret-a-lumiere Strobing Gel Highlighter
Rimmel Lasting Finish Soft Colour Blush 010 Santa Rose
Essence Eyeshadow 15 Hazel Me Not!
Eyes:
Holika Holika Wonder Drawing Skinny Eyebrow 02
Urban Decay Eyeshadow Primer Potion Original
Zoeva Caramel Melange - Wax Paper
Zoeva Caramel Melange - Universal Delight
Zoeva Caramel Melange - Start Soft
Zoeva Caramel Melange - Aftertaste
Too Face Semi-Sweet Chocolate Bar - Truffled
Colourpop Super Shock Shadow - Moonwalk
Zoeva Mixed Metals - Bronce
Avon True Colour Eyeshadow Quad Underwater Paradise - Shade 3
Clio Kill Black Waterproof Pen Liner - Black
Stargazer Glitter Eyeliner - Gold
Maybelline Lash Sensational Lash Multiplying Mascara - Black
theBalm Mary-Lou Manizer
Primark Individual Lashes
Duo Adhesive
Lips:
Nude - NYX Soft Matte Lip Cream - London + Athens
Red - Avon True Colour Perfect Reds - Scarlet Siren
4 Festive Glittery Manicures with Avon Magic Effect Liquid Sequin Nail Polishes
24 Dec 2015
Hey Beauties!
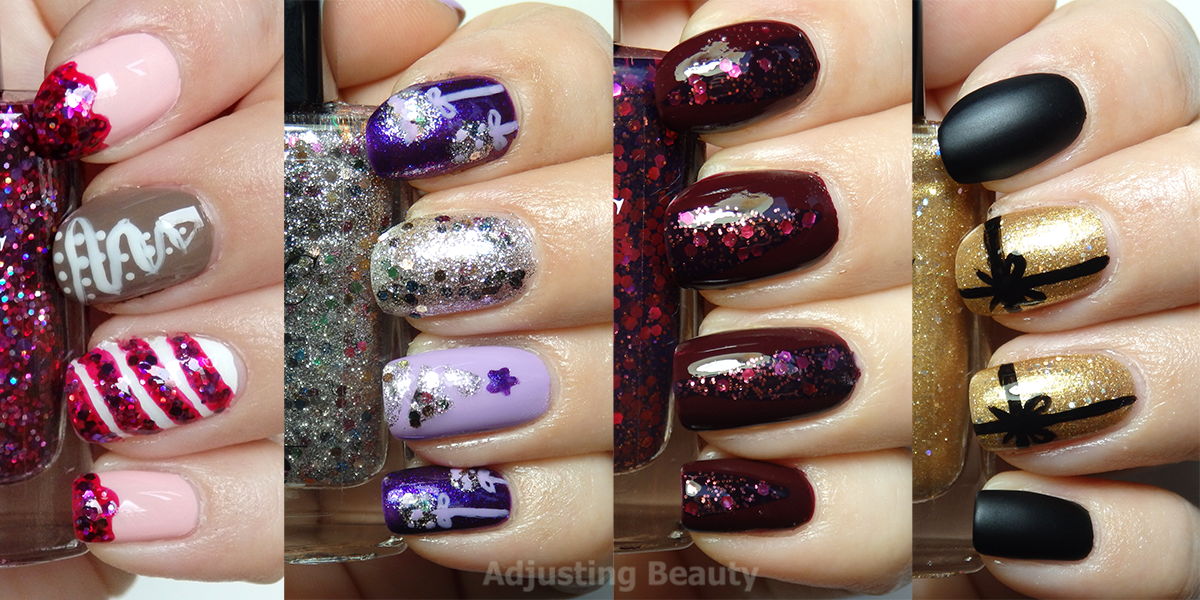
I hope your home is already sparkly by now. We have a Christmas tree up and all the pretty lights. Today I wanted to share four sparkly manicures for either Christmas or New Year's Eve or just the next week in general. I got these super pretty Liquid Sequin nail polishes by Avon and they seemed perfect editions to the holidays.
First manicure is one of those that I see a lot around the internet, but I was recently admiring it on Mateja's nails. It's pretty simple to do, if you do it right.
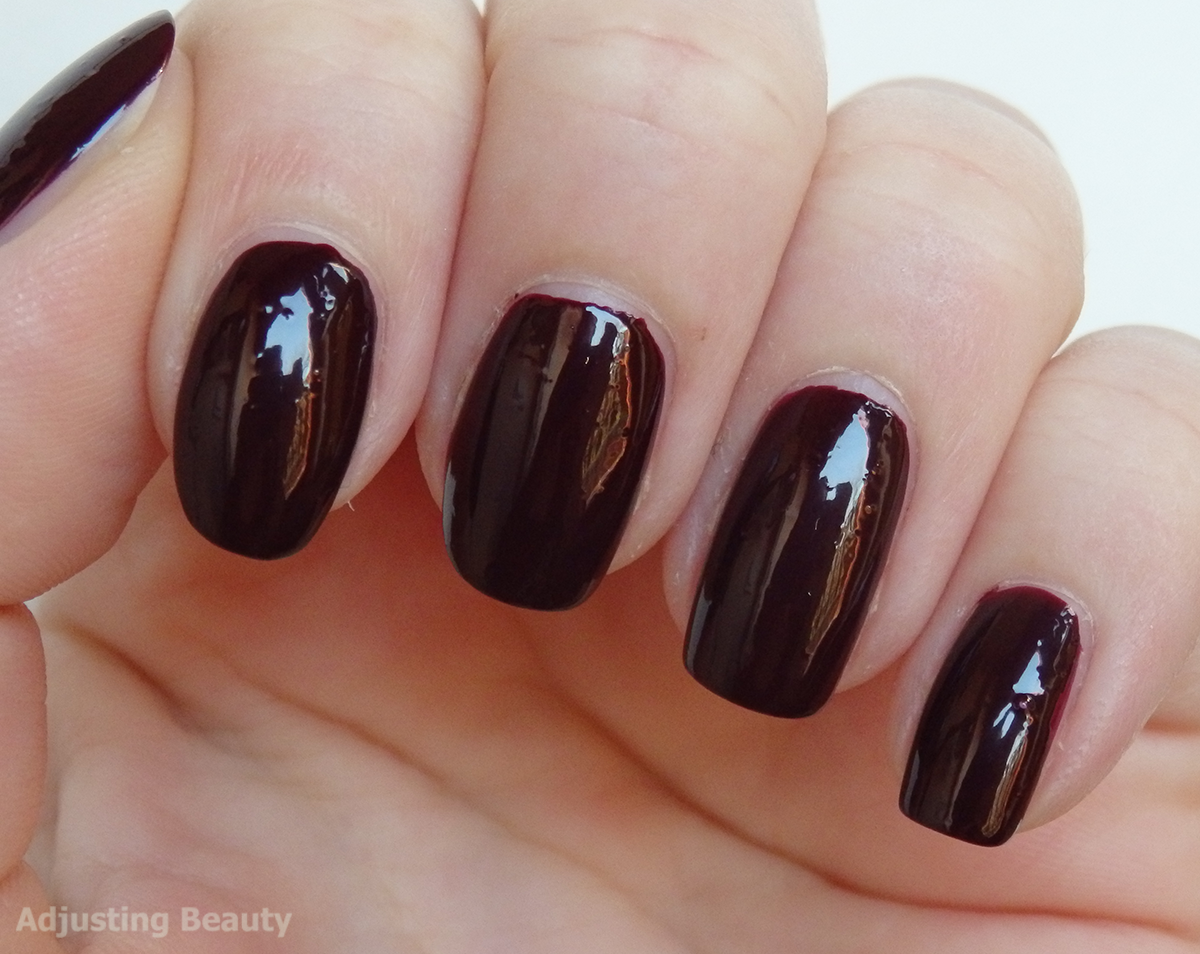
I started by painting my nails with a red wine nail polish shade (Revlon Vixen). When it completely dries (I was a bit too impatient), apply small pieces of tape to create the triangle shape on my nails. This part is always tricky on my nails, because I can never make it look perfectly even. Once you have this just paint your sparkly nail polish (Avon Magic Effect Liquid Sequin Dazzle) over it and quickly remove the tape, before the nail polish dries. Voila. Now you can apply top coat and make it even more shiny.
For the second manicure I applied lavender nail polish (Kiko Nail Lacquer 330) on my thumb and ring finger. On my index and pinky I applied dark violet shimmery nail polish (Models Own Roxy) and on the middle one I applied sparkly silver nail polish (Avon Magic Effect Liquid Sequin Sequin).
Then I used the same sparkly silver nail polish and applied it on all purple nails as different sized dots to make it appear as a Christmas tree ornaments. The I used the opposite purple shade and drew strings coming from the upper part of the nail down and I created a little bow to make it look like they hang down. I also drew some really simple wavy lines and dots on the ornaments.
On my ring finger I wanted to create Christmas tree. So I used the same tape as in the first manicure and then I used some smaller decorative nail tape and put some lines across it. I applied sparkly silver nail polish over it and quickly removed the tapes. I also drew a little star at the top with dark violet nail polish. To make it look more perfect, I finished with lots of shiny top coat.
For this one I went a bit more candy or cookie like. I applied brown nail polish (Kiko Nail Lacquer 322) on my thumb and middle finger. On my index and pinky I applied light pink nail polish (Maybelline Colorama 77) and on the ring finger I applied white nail polish (Revlon Nail Enamel White on White).
On the thumb I drew snowflake design with white nail polish. I also added different sized dots to represent falling snow. On my middle finger I drew a wavy line to make it look like a Christmas tree. In between the lines I drew small dots for the ornaments.
For the ring finger I used sparkly pink nail polish (Avon Magic Effect Liquid Sequin Glitterati) and I drew diagonal lines to represent the candy cane pattern. On my other pink painted nails I also applied glittery pink nail polish on the tips of nails to make it look like a frosting on top of cupcakes or something like that. Finish with top coat. It should look yummy and inviting.
The last manicure is the most minimalist and still looks like you put some effort in it. I used black nail polish (Maybelline Colorshow 677 Blackout) on my thumb, index and pinky. On middle and ring finger I applied sparkly gold nail polish (Avon Magic Effects Liquid Sequin Glimmer).
Then I applied matte top coat (Kiko 3 in 1 Mat Fortifying Fast Dry Base and Top Coat) over the black nails. Over gold nails I drew two black lines to represent wrapping paper and then I drew small bows to make it look like wrapped presents. I also applied top coat over these gold nails.
The beautiful sparkly nail polishes are the newest Magic Effects range added to Avon. They are called Liquid Sequin. The range currently has four different shades.
Sequins usually look like hexagon shapes and those are in these nail polishes. It looks like sequins in the nail polish with a colored base. Some even have added small shimmer.
The formula is in between being liquid and thick and it applies nicely, although sequin parts can sometimes slide over with your brush, so you need to assemble them on the nails and pull them in all directions to make it look even. You do get a nice amount of hexagons with just one coat.
One coat looks more sheer with some, while others are already opaque enough.
Two coats cover the nail, but can also look a bit thick with some of these. The finish is shiny, but also a bit 3D, because of the bigger hexagons.
Glitterati
Glitterati has a pink sheer base. In the base are bigger blue hexagons and smaller silver hexagons, which actually have a multi chrome sheen to them, so they look different colors at different angles.
Sequin
This one is very interesting. It has a transparent base with lots of small silver shimmer. Hexagons in it have different colors: silver, gold, blue, green, pink and copper. This one is actually a bit more opaque because of the small shimmer, so one coat can be enough.
Dazzle
This was the first one that caught my eye. It's the pretties one in the bottle. The base is dark blue purple. In it are bigger pink hexagons and small copper shimmer. The combination looks so pretty, especially over darker nail polishes. This one is also very opaque in just one coat, because of the dark base.
Glimmer
Glimmer is the most subtle of these. It has a shimmery gold base. In it are middle sized silver hexagons with multi chrome sheen. One coat is pretty sheer and two look best, although you can apply just one coat over other colored nail polishes.
They look great on its own or as a statement nail among your other colored nails. They also look really pretty over other colored nail polishes. All of these have pretty sheer bases so one coat is still gonna let the base polish be seen through. Especially Glitterati and Dazzle are great for layering over darker nail polishes. Sequin and Glimmer look better on its own although you can still use it on top. Those have more shimmer in it and are therefore are a bit less seen through. I also like if you apply top coat over them, because it makes them extra shiny and it looks more smooth.
A very pretty glittery effect nail polishes. I hope you liked my manicure ideas. Maybe I gave you some inspiration for today and tomorrow, if you're still deciding what to wear on your nails. Which one of these is your favorite?
Oznake:
Avon,
Dazzle,
Glimmer,
Glitterati,
glittery,
gold,
hexagon,
Liquid Sequin,
Magic Effects,
nail polish,
pink,
purple,
review,
Sequin,
shimmer,
silver,
sparkly
Subscribe to:
Posts (Atom)